Turn Your Image into a JEF File for Janome Embroidery Machines

Hey there, Janome stitchers and creative makers! If you've ever stared at a favorite photo, logo, or digital sketch and thought, “I wish I could see this embroidered on a towel, jacket, or baby onesie,” you're in the right place. Janome embroidery machines—whether it's a Memory Craft, Horizon, or one of the newer multi-needle models—deliver beautiful, precise results when fed the right file. That file is JEF, Janome's native format designed to speak the machine's language perfectly. Turning any ordinary image into a stitch-ready JEF design unlocks endless possibilities for personalized gifts, branded apparel, or small-batch custom work. This guide walks you through the entire modern process so you can convert image to JEF file with confidence and get clean, professional embroidery every single time.
Why JEF Is the Smart Choice for Janome Machines
JEF is Janome's home-grown format, built from the ground up to match the way their machines read stitch data, manage thread tension, and handle hoop movement. It packs in exact needle coordinates, stitch angles, density settings, underlay instructions, pull compensation values, color changes, trims, jumps, and even stop commands for manual thread swaps or appliqué placement.
Because it's native, your Janome loads JEF files instantly, shows an accurate on-screen preview, and stitches with the exact behavior the engineers tuned for. Other formats (PES, DST, EXP, VP3) can sometimes load, but they often carry over tiny translation quirks—slight registration drift between colors, unexpected density shifts, or long jumps that snap threads. Sticking to JEF keeps everything predictable, especially on newer models that run faster and handle denser artwork without complaint.
Common Pitfalls When Starting from a JPG or PNG
Most conversion headaches begin with the source image itself. People upload noisy photos with busy backgrounds, gradients, low contrast, or tiny details that auto-tools can't interpret correctly. The software guesses stitch paths poorly and produces jagged edges, over-dense fills, or missing outlines.
Another frequent issue is ignoring fabric differences. A file that stitches cleanly on cotton twill can pucker badly on stretchy performance knits or sink into thick fleece without proper underlay and compensation. Beginners also skip real testing—screen previews lie, but actual stitches on real fabric tell the truth every time.
Cleaning and Prepping Your Image First
Before you open any digitizing software, spend five minutes cleaning the image in a free editor (GIMP, Paint.NET, or Photopea in your browser):
- Remove the background completely (transparent or solid white)
- Increase contrast so edges become razor-sharp
- Reduce colors aggressively—aim for 8 to 15 solid shades
- Eliminate details smaller than 3–4 mm (they almost always fill in)
- Crop tightly around the subject
- Resize to your final embroidery dimensions right now—never scale up later
For logos or text-heavy artwork, make sure lettering is at least 5 mm tall and use blockier fonts when possible. Clean artwork makes digitizing ten times faster and delivers dramatically better stitch quality.
Choosing Beginner-Friendly Software That Exports Clean JEF
You need a program that imports images well and exports reliable JEF files. Here are the most approachable options in 2026:
- 6D Embroidery (official Husqvarna Viking/Pfaff suite) – native JEF support, excellent tutorials, perfect for Janome/Viking owners
- Embrilliance Essentials + StitchArtist – affordable, intuitive, strong JEF export
- Hatch Embroidery – powerful auto-digitizing and manual tools, solid JEF output
- Ink/Stitch (free Inkscape extension) – completely free, exports JEF surprisingly well for simpler designs
If you already own a Viking/Janome machine, start with 6D for the smoothest experience. If you want flexibility and lower cost, Embrilliance is hard to beat for beginners.
Step-by-Step Conversion That Delivers Professional Results
- Import your cleaned image and lock it as a reference layer.
- Use auto-digitizing for a quick first pass on simple logos or clipart.
- Switch to manual mode and trace every major element separately: background, mid-layers, outlines, text, accents.
- Assign stitch types: satin for borders and lettering (glossy shine), tatami for larger fills (even coverage), running for fine lines or light underlays.
- Add underlay to every object—edge-run under satin, grid or zigzag under fills.
- Apply pull compensation: widen satin columns slightly to fight fabric push.
- Optimize paths: connect nearby objects, hide travel runs, shorten trims, add tie-offs.
- Sequence colors logically: large areas first, details last.
- Preview in 3D simulation—check density, pull effects, and backside appearance.
- Export as JEF with correct hoop size and centering.
Save both your working file and the final JEF export with clear names so you can find and reuse them easily.
Testing and Tweaking for Perfect Stitch-Outs
Export the JEF file, transfer it to your machine via USB, and stitch a sample on scrap fabric matching your final project—same weight, stretch, and color. Watch the first few colors carefully. Look for puckering, misalignment, tension issues, or small text filling in.
Common fixes:
- Puckering → reduce density or add more underlay
- Small text disappearing → enlarge letters or add extra underlay
- Registration drift → review color sequence and compensation
- Thread breaks → shorten jumps and optimize paths
Make small adjustments, save a new version, and test again. One good sample guarantees success on the real garment.
Quick Habits That Save Time and Fabric
- Keep stitch counts reasonable (under 50,000 for most home projects)
- Use high-quality thread that matches your software’s palette
- Vary stitch angles to reduce pull in one direction
- Group similar colors to minimize thread changes
- Always test on the exact fabric type you’ll use
These small habits separate okay embroidery from the kind that makes people stop and say “wow.”
Conclusion
Converting images into JEF embroidery files is straightforward when you follow a smart process: clean preparation, thoughtful stitch choices, proper underlays and compensation, optimized paths, realistic previews, and thorough testing. When you do it this way, your Janome or Viking machine runs efficiently, your designs look expensive, and your finished pieces turn heads. Whether you're embroidering for fun, creating gifts, or running a custom apparel side hustle, mastering this conversion puts professional-quality results within reach. Grab your next image, open your digitizing software, and start building that perfect JEF file. Your next embroidered project is waiting to shine—one clean, confident stitch at a time.
Categories
Read More
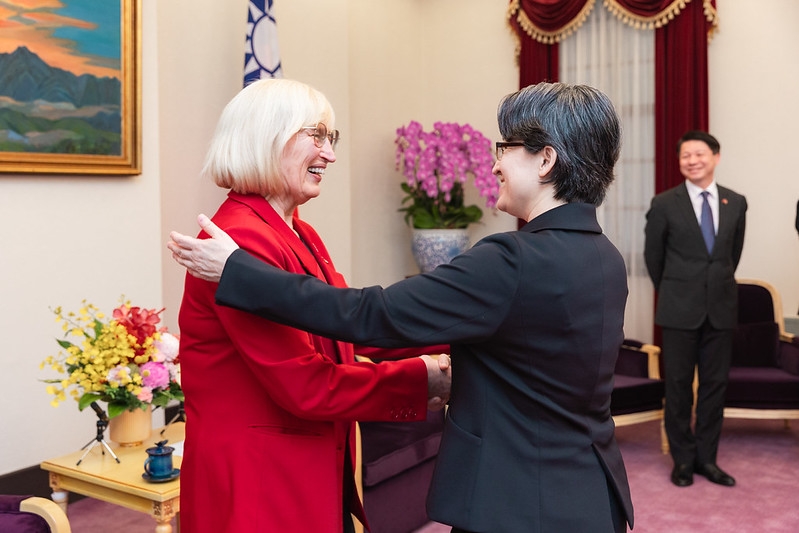
(圖/ 總統府) 副總統蕭美琴7日於總統府接見拉脫維亞國會訪團,雙方就民主制度、防衛安全及產業合作等議題進行交流。蕭副總統指出,臺灣與拉脫維亞雖地理距離遙遠,但在當前國際局勢快速變動之下,對於維護民主體制與自由價值的立場一致,未來可望持續深化雙邊合作關係。 (圖/ 總統府) 蕭副總統表示,面對全球地緣政治風險升高,民主國家之間的連結與合作愈顯重要。臺灣長期致力於鞏固民主制度與提升國家安全,並持續強化自我防衛能力,以確保自由與穩定的社會環境。她強調,自由與民主並非理所當然,而是需要透過制度與實力共同維護。 (圖/ 總統府) 在產業合作方面,蕭副總統指出,臺灣與拉脫維亞在科技領域具備高度互補性,尤其在半導體、人工智慧及無人系統等新興產業具備發展潛力。臺灣在全球晶片供應鏈中占有關鍵地位,並在AI硬體製造領域扮演重要角色,未來可望透過技術交流與產業合作,進一步提升雙方競爭力與安全韌性。...
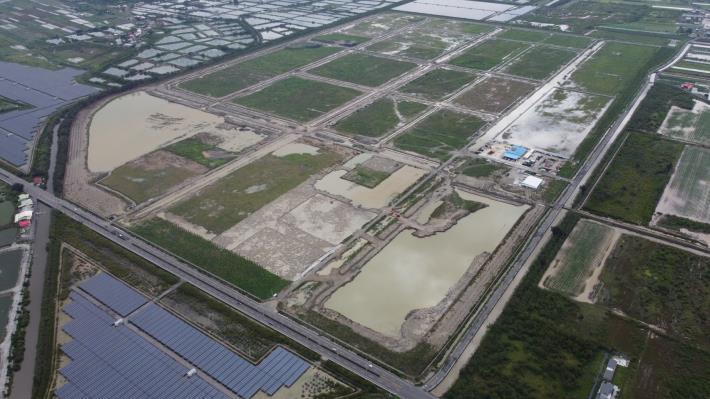
(圖/ 臺南市政府經濟發展局) 臺南市七股科技工業區招商頻傳捷報,開發進度超前,市府積極推動基礎建設升級,創新規劃將變電所與服務中心共構,提升園區土地使用效率,並強化園區競爭力。 市長黃偉哲指出,這項創新設計不僅打破傳統設施分離的限制,更兼顧美觀與實用。服務中心負責園區日常管理及業者支援,變電所則確保穩定電力供應,兩者合一成為臺灣產業園區的新典範。 華廈模型 (圖/ 臺南市政府經濟發展局) 經濟發展局局長張婷媛表示,七股科工區變電所與服務中心共構的模式為首創,有效提升土地使用率並優化空間配置,展現臺南市府與台電等國營企業合作的前瞻思維。 在市府協助下,台電同步推動變電所與輸配電線路建設,縮短工期並降低成本。該共構變電所已進入建照申請階段,預計114年8月開工,117年完工供電,將進一步穩定園區電力,吸引更多企業投資。 (圖/ 臺南市政府經濟發展局)...
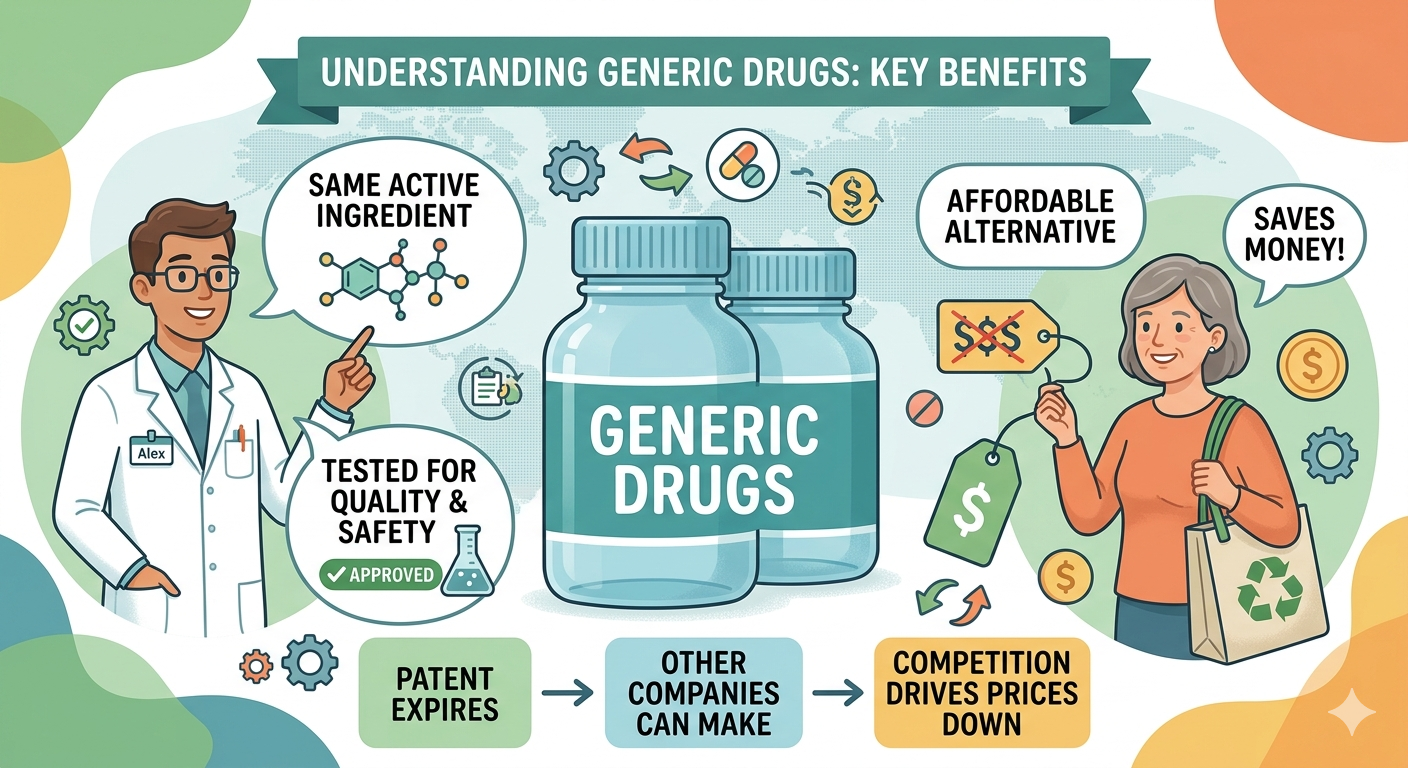
The pharmaceutical sector across North America continues to evolve as healthcare systems focus on affordability, accessibility, and long term treatment efficiency. Generic medications have become an essential component of prescription drug strategies due to their ability to provide cost effective alternatives to branded therapies. Rising chronic disease prevalence, expanding aging populations,...